I was in Boston and New York last week with my best friends for a little get away/adventure time and it was so fantastic! Of course I have a ton of pictures but Ill refrain from boring you with those. We basically walked a lot, ate a lot, and did a crap ton or sight seeing. Im still recovering after 3 days back at home from all of the heavy food and nonstop hustle and bustle of the city. Ive been meaning to make some new drapes for the dining room for quite some time but could never get around to it... so I thought to myself what better way to recover than to throw myself into another project?
The dining room drapes came with the house, and it isn't that they are really all that bad, they just aren't right for our décor or color scheme. I have not been able to find something that I really liked so I decided I was going to make my own. I happened to find some super cheap linen drapes for 10 bucks at Big Lots and thought I work....
I had just about finished with the first drape and was genuinely excited about how they were turning out when my Hunny walked in and looked upon them. He stared or a little while and I started to fear that he hated them. CRAP! But instead told me he said how much he liked them...and then asked me if the were the right size.
The...right...size?!?!
@#$%! How could I have overlooked step one of this whole process? The most important one? The drapes are too small and so I have to start over with larger ones. I have a tutorial for them but I want to be able to post the before and after pictures of the final product. Im so pissed at myself.
Anyway, I think I will just sell the first drapes on Etsy and at least now I have the hang of this whole thing. Stay tuned for the ACTUAL drapes...
Wednesday, February 27, 2013
Friday, February 22, 2013
Hearty Pumpkin Chili
Its funny, I get so sick of summer and being hot... so I wish for winter. Then winter hits and I get so sick of being cold... so I wish for summer. Im just never happy, but at least until I have some delicious, hearty, hot foods while I sit under my blanket with a good movie and my Hunny. This chili is amazing. The pumpkin gives it a nice creamy texture and it also gives the flavor a lot more depth. You really cant taste the pumpkin itself at all. If you want you can make this meatless and maybe add more beans to it, or play with it as you like. This makes a lot of leftovers too that you can freeze for later. Or this chili is even better the next day!
Ingredients
1 pound ground turkey
1 tbsp. butter
1 small sweet onion
1 green pepper
3 gloves garlic
14.5 oz. can diced tomato (I used fire roasted
14.5 oz. can tomato sauce
14.5 oz. can black beans
1 can pumpkin puree ( not pie filling)
3/4 cup dry lentils
2 cups chicken stock ( about 1 can, you can use vegetable or beef stock as well)
1 tbsp. pumpkin pie spice ( don't worry... )
1 tbsp. chili powder
Dash of cayenne pepper
salt and pepper to taste
14.5 oz. of chickpeas
I didn't really take any pictures of this as I should have, buts its a fairly simple process.
In a stock pot over medium high heat, add the butter and fry the onion, pepper and garlic for a few minutes. Add ground turkey and brown. Then, add all the other ingredients EXCEPT the chickpeas. Cover, reduce the heat and simmer for about 30-40 minutes stirring occasionally. Add the chickpeas and simmer for about 10 minutes more.

Top with some parmesan cheese or Greek yogurt and serve with some cornbread!
Give it a try, you will love it! Its very easy to make this a vegan or vegetarian dish. This can feed a whole family for very little money! Enjoy!

Tuesday, February 19, 2013
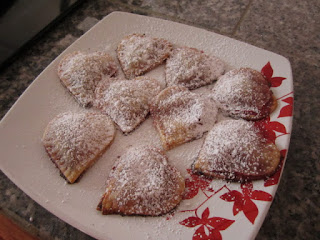
Mini Strawberry Cream Cheese Hand Pies
Yum Yum Yum!!! I made these for my Hunny (yes, I like to spell it that way!) for valentines day this year and they were so incredibly easy and delicious! They are so versatile too... you can use so many different fillings, the possibilities are endless! I made them into heart shapes so that they were a little more festive. To make them the way that I did all you need is.
Strawberries about 2 cups or so with tops cut off
Sugar
8 oz. Cream Cheese at room temperature.
Frozen Pie Crust or your own favorite pie crust
Powdered Sugar
Cookie Cutter
I put the strawberries in a bowl and sprinkled a little sugar on them and let them sit for a while. Preheat the oven to 350.
Throw the cream cheese and about a quarter cup of sugar into your mixer and mix until smooth and well blended.


Spoon a little cream cheese into the center of the piecrust cutout, and then some strawberry on top of the cream cheese. Leave some space around the edges of the crust! As you can see from my picture, I wasn't careful with the juices... so don't make my mistake. Use your finger and with either water (or in my case strawberry juice) and dampen the edges of the pie crust. This will make sure that your top crust sticks to your bottom crust.


Stick those babies in the over for about 15-20 minutes, or when the crust is browned. Let them cool completely and if you so desire, sprinkle some powdered sugar on top! So yummy! Enjoy!
Strawberries about 2 cups or so with tops cut off
Sugar
8 oz. Cream Cheese at room temperature.
Frozen Pie Crust or your own favorite pie crust
Powdered Sugar
Cookie Cutter
I put the strawberries in a bowl and sprinkled a little sugar on them and let them sit for a while. Preheat the oven to 350.
Throw the cream cheese and about a quarter cup of sugar into your mixer and mix until smooth and well blended.

I just mashed up the strawberries, youll have to be careful with the juice if you do it this way but I was feeling lazy. You can also chop them up before you add the sugar to them.

Roll out your pie crust and use the cookie cutters to make an even amount of cutouts. I got about 50 cutouts from my two pie crusts which makes 25 hand pies. This will depend on the size of your cookie cutter.

Spoon a little cream cheese into the center of the piecrust cutout, and then some strawberry on top of the cream cheese. Leave some space around the edges of the crust! As you can see from my picture, I wasn't careful with the juices... so don't make my mistake. Use your finger and with either water (or in my case strawberry juice) and dampen the edges of the pie crust. This will make sure that your top crust sticks to your bottom crust.

Place the top crust on the bottom crust and seal around the edges with a fork. Parchment paper is best, but since I didn't have any on hand I just used some greased foil.

Stick those babies in the over for about 15-20 minutes, or when the crust is browned. Let them cool completely and if you so desire, sprinkle some powdered sugar on top! So yummy! Enjoy!

Saturday, February 16, 2013
Decoupage Frame
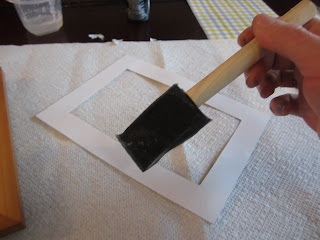
My best friends a I turn 30 this year.. for most of us we feel miserable about it and wouldn't mind freezing time right now. But, there are a few of us crazy girls who have actually looked forward to turning 30 as a new chapter. I happen to be a miserable one, but I wanted to do something special for my girls this year, so I made some decoupage frames that I put some special pictures of us in. Its a little messy and even though you aren't actually working on it for hours, it does take a good day or two to complete. You need:
Flat faced frame of any kind
Scrapbook paper
Glue or Mod Podge
Small wooden figure
Foam Brush
Paint
Scissors
Glue Gun
I didn't have any Mod Podge so I had to make my own. I also didn't have any regular glue (and I call myself a crafter) so I grabbed a glue stick I had, cut off the tip and squeezed the glue into a container.

All you need to do to make your own Decoupage glue is add a little water to your glue. About 4 parts glue to 1 part water. Mix it up and you're ready to go!
Lets do this...
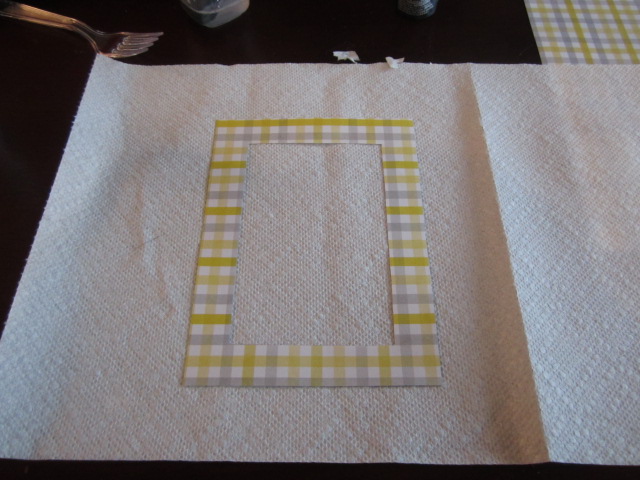
Remove the back and the glass from the frame and place face down on the wrong side of the paper so you can trace around the outside and inside of the frame.


Once you have the shape of your frame traced into your paper, go ahead and cut it out.

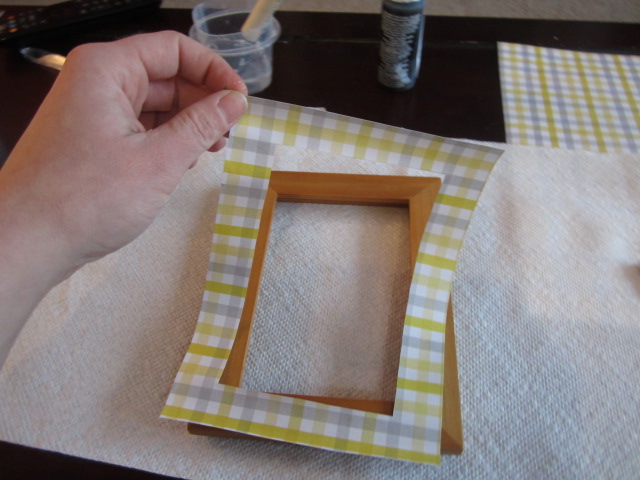
Using your foam brush, smear some glue onto the back of your paper and carefully place onto the front of the frame.
Make sure you smooth out any creases or bubbles and that there is no frame showing around the edge of your paper.

If you are happy about your paper placement, apply some glue all over the front of the paper and down the sides of the frame. The paper is going to look wet and ruined but I swear when it dries it will looks fine! I promise!


See, hes quite annoyed... I love him so.
Anyway! You are going to be putting 3 to 4 more coats or glue over the frames, and wait for them to dry each time in-between. This can be a slow process but its worth it. So after you take a few pictures of your beloved animal, we can prepare the wood figures that you will place on your frame. I had birdies on hand so that's what I used. Try to use paint that will complement the paper you used. I painted the birdies grey and will use yellow lettering.


 Remember to keep an eye on your frames and put more glue on them once they've dried again. When they are complete and you have put enough layers of glue on them, attached your wood figures using a glue gun.


I sprayed both my frames with some lacquer as well to make sure they were sealed well. I let that sit for about 24 hours before I put the backs back into the frames and enjoyed my handy work! My girlfriends loved their frames! Enjoy!

Flat faced frame of any kind
Scrapbook paper
Glue or Mod Podge
Small wooden figure
Foam Brush
Paint
Scissors
Glue Gun
I didn't have any Mod Podge so I had to make my own. I also didn't have any regular glue (and I call myself a crafter) so I grabbed a glue stick I had, cut off the tip and squeezed the glue into a container.

All you need to do to make your own Decoupage glue is add a little water to your glue. About 4 parts glue to 1 part water. Mix it up and you're ready to go!
Lets do this...
Remove the back and the glass from the frame and place face down on the wrong side of the paper so you can trace around the outside and inside of the frame.


Once you have the shape of your frame traced into your paper, go ahead and cut it out.
Using your foam brush, smear some glue onto the back of your paper and carefully place onto the front of the frame.

Make sure you smooth out any creases or bubbles and that there is no frame showing around the edge of your paper.
If you are happy about your paper placement, apply some glue all over the front of the paper and down the sides of the frame. The paper is going to look wet and ruined but I swear when it dries it will looks fine! I promise!

Then we wait for it to dry completely. I took some pictures of my adorable little Lovey love Dog, Archer. He was not impressed with my disturbing his nap....


See, hes quite annoyed... I love him so.
Anyway! You are going to be putting 3 to 4 more coats or glue over the frames, and wait for them to dry each time in-between. This can be a slow process but its worth it. So after you take a few pictures of your beloved animal, we can prepare the wood figures that you will place on your frame. I had birdies on hand so that's what I used. Try to use paint that will complement the paper you used. I painted the birdies grey and will use yellow lettering.


When those dry, use a paint pen or just a small brush and paint (if you have a steady hand) and write whatever you like on your wood figures. I made a "Friends" and a "Best Friends" frame so I went with that


I sprayed both my frames with some lacquer as well to make sure they were sealed well. I let that sit for about 24 hours before I put the backs back into the frames and enjoyed my handy work! My girlfriends loved their frames! Enjoy!

Wednesday, February 13, 2013
Paper Heart Wreath
Its that time of year again. Pink and White take over for the Christmas Red and Green, love is in the air... or bitterness... however you happen to feel about Valentines day. I came across this really simple and quick project that even the kids can get into. Plus its absolutely adorable hanging on the front door, or in flames in your wood stove.. what have you. :) All you need is:
Scissors
Pencil
Ruler
Glue Dots or Glue.
4 sheets of double sided 12X12ish scrapbooking paper(5 or 6 if you want a more ovular wreath)
String or yarn
I was able to make 4 wreaths out of the 4 sheets of paper I had. And Ill have you know right now before we start all of this, that I am officially on my third glass of wine waiting for my bestie Shae (of Shaeberries) to pick me up from the airport...weeeee!!!!

Start by measuring out 2 inch strips along the short side of you paper (if there is a short side).

Mark the strips out by using a ruler or something straight sided.

Cut along your marks to create the 2x12(ish) strips....duh....


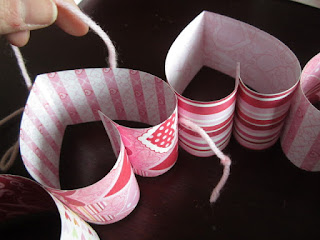
Now, bend the open sides so that the outsides are facing each other, and put glue dots (or regular glue of you like) creating a heart shape.

Go ahead and finish off all of your strips. You should have 8 hearts in all for 1 wreath.

Use a couple glue dots to start attaching the hearts to each other around the top of the curve.

Once you've completed the circle of hearts, you can thread some yarn, string or ribbon in-between a couple of the hearts to hang it. I used yarn since that happened to be all that I had. You can tie a knot at the end of the string to keep in in place and try to put at least two hearts between the places you put the string.
Scissors
Pencil
Ruler
Glue Dots or Glue.
4 sheets of double sided 12X12ish scrapbooking paper(5 or 6 if you want a more ovular wreath)
String or yarn
I was able to make 4 wreaths out of the 4 sheets of paper I had. And Ill have you know right now before we start all of this, that I am officially on my third glass of wine waiting for my bestie Shae (of Shaeberries) to pick me up from the airport...weeeee!!!!

Start by measuring out 2 inch strips along the short side of you paper (if there is a short side).

Mark the strips out by using a ruler or something straight sided.

Cut along your marks to create the 2x12(ish) strips....duh....

You are doing to use two strips from each piece of paper. So sort them into piles so you can be sure which strips go to which wreath. The reason is that since this is two sided paper, each pattern will be both the inside and then the outside of a heart. You'll see what I mean.

Now...fold each strip in half using one pattern on the outside and using that same pattern on the inside for the second strip. Like so..

Beautiful! Heres our little baby strips just waiting to be make into lovely little hearts.

Now, bend the open sides so that the outsides are facing each other, and put glue dots (or regular glue of you like) creating a heart shape.

Go ahead and finish off all of your strips. You should have 8 hearts in all for 1 wreath.

Use a couple glue dots to start attaching the hearts to each other around the top of the curve.

Once you've completed the circle of hearts, you can thread some yarn, string or ribbon in-between a couple of the hearts to hang it. I used yarn since that happened to be all that I had. You can tie a knot at the end of the string to keep in in place and try to put at least two hearts between the places you put the string.

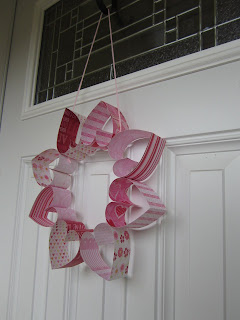
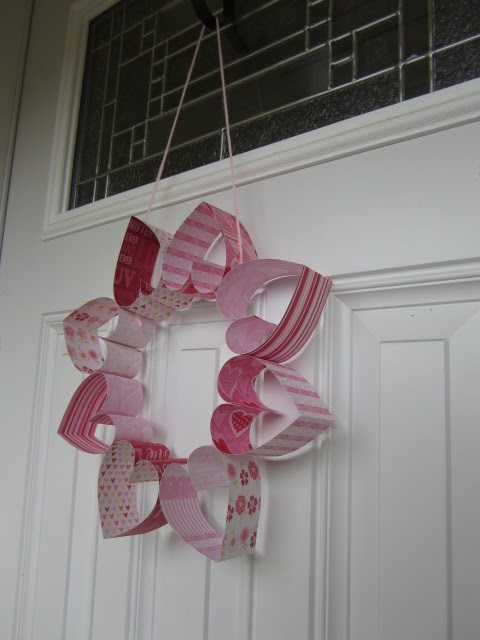
And WALLA! You are all done with your festive paper heart wreath! I hung mine on the front door, but it looks great anywhere really. You should still be able to make 3 more wreaths for your friends and family as your valentine gift! Enjoy!
Subscribe to:
Posts (Atom)