Pages

Monday, March 11, 2013

Hand Stenciled Drapes

Finally! I have been working on these drapes forever! As you saw in one of my previous posts I screwed up on my last set because they were way too small. I finished them anyway and hope to sell them on Etsy, but in the meantime I got to work on the drapes I plan on keeping. Here are the drapes that came with the house...


Now, as I said in the last post, they really aren't THAT bad. They certainly do not go with our color scheme though, so I moved these downstairs and had decided I was going to stencil my own since I couldn't find any I liked.

This was pretty simple to do, but it is very time consuming, so plan on this taking several days.

What you'll need:

Plain drapes
Fabric Paints in the colors you want
stencils
sponge or stencil brush
paper plates
painters tape

I found some cheap plain linen drapes and laid them out on garbage bags in my garage.


I mentally mapped out where I was going to put my stencils and  colors. I have 4 colors; red, brown, camel and grey.

Tape down your stencil so that it 1.) stays in place, and 2.) covers up the edge and other stencil patterns so you don't get paint where you don't want it.


I ended up using a lot more tape after this picture :) Then put your paint on a plate and dab with the sponge. Make sure you dab away from your paint blob to get off any access paint. Now lightly press onto your stencil. If you press too hard or have too much paint, it can get underneath the stencil and cause bleeding or smudging. Get you paint into each hole in your stencil and take care that no spots were missed.


Now gently pull your stencil off and place in the next spot.


Isnt that preeeeetty!? I did both big and small stencils in each color. First I used a slightly burnt red.


Then an espresso brown.
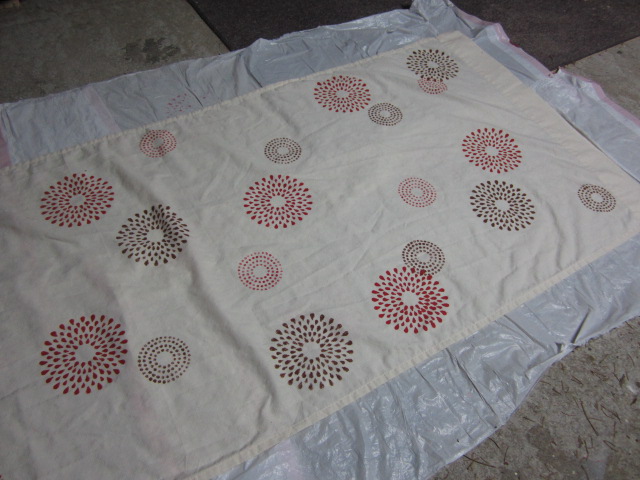


A nice camel color.


Finally I used a grey. I made this a but lighter than the rest because I wanted it to be a little more "ghosty" in the background... if you know what I mean...
 
 
Now I really liked overlapping the big and small ones at some points. I kept all the small ones separate from each other and the big ones separate from each other. I loved the way that it turned out and it kept my eye from catching anywhere in particular, which Is exactly what I wanted.
 
After my drapes were all dry I hung them up!!! I am so happy with how they turned out!! They match my colors and they are unique and fun without being too loud. Heres the before and after...


and..... after!

 
Tada! It really brightens the room! I highly recommend just doing your own if you are feeling adventurous enough. There are a ton of really great stencils out there and there is even plain stencil that you can cut your own pattern into. Enjoy!


Tuesday, March 5, 2013

Lemon Lavender Shortbread Cookies

After swearing that I was going to sit on my butt and watch movies all day, something that pretty much never ever happens, I ended up making these cookies. I couldn't help it! I'm just not one of those people that can have a day of doing nothing. Honestly, I wish I could sometimes and I'm sure my Hunny would agree. I drive him crazy when he wants to relax and I'm making all kinds of noise and getting in his way all day long... oh well :)

The cookies are absolutely amazing! I love the flavor of lemon and lavender together, so I found this recipe off of pinterest. I didn't have to change a thing other than add a tad more lemon than called for. The cookies are beautifully fragrant and are quite pretty themselves. I want to imagine myself sitting in a circle of friends with big frilly hats, a cup of tea and these cookies arranged on the table in-between us.


Ingredients:

COOKIES
1 cup unsalted butter, at room temperature
3/4 cup confectioner’s sugar (or more, depending on the consistency after you add the lemon juice)
2 tablespoons lemon juice (or 1/4 teaspoon lemon extract)
1–1/2 tablespoons freshly grated lemon zest (about 2 large lemons, preferably Meyer)
1/8 teaspoon salt
1/3 cup cornstarch
2–1/2 cups all purpose flour
1 tablespoon dried lavender flowers

ICING
1 cup confectioner’s sugar
3 teaspoons dried lavender flowers
2 teaspoons freshly grated lemon zest (about 1 large lemon, preferably Meyer)
1–2 tablespoons lemon juice

COOKIES
1. Cream together the butter and confectioner’s sugar until smooth. Mix in the lemon juice (or extract) and zest. Set aside.
2. Sift together the salt, cornstarch and flour. Add this to the butter mixture and stir until the flour coats the butter but isn’t completely worked in. Add the lavender flowers.
3. Using your hands, lightly rub the ingredients together until the mixture is no longer dry. You will know it’s done when it forms easily into a dough ball. Try not to overwork the mixture or you will end up with tough cookies.
4. Flatten the dough out into a disc and place in a plastic re–sealable bag. Refrigerate for 30 minutes (or up to three days).
5. Preheat the oven to 325° F.
6. Take the fully–chilled dough and place it on top of a piece of parchment or a Silpat. Using a rolling pin, roll the dough out to a thickness of 1/3 inch. Cut into desired shapes with cookie cutters. (This dough barely spreads, so don’t worry about leaving a lot of space between each cookie.) Remove the scraps from between each cookie and re–form into a flat disc. (If dough has become too soft or warm, re–refrigerate it for a few minutes before attempting to roll it out.)
7. Lift up parchment paper or Silpat and place on top of cookie sheet. Transfer sheet to upper third of oven and bake for about 15 minutes (or until the edges of the cookies just start turning golden on the edges). Allow to cool before icing. If you already decorated the cookies with colored sugar, you won’t need to ice them (although I did both to some of my cookies and they turned out extra–special!).

ICING
1. Whisk together first three ingredients. Start mixing in lemon juice by using one tablespoon at first, then continue adding in only enough to produce a smooth, fluid icing.
2. It is easiest to ice the cookies by dipping the tops into the icing and turning them over onto a wire rack (that has a paper towel under it to catch the drips). The icing will dry on the cookie and not stay sticky.

Then.... EAT and Enjoy!!!


Saturday, March 2, 2013

Super Easy Crochet Headband or Ear Warmer Pattern

I mentioned in my last post that my best girlfriends and I spent a week in Boston/NYC. A few hours before we were supposed to leave for the airport I realized I didn't really have any ear warmers or earmuffs to keep out the cold. I had a ton of beanies that I've made, but I don't always like to wear them.... I needed to make an ear warmer and FAST!

I dug through all of my handwritten patterns and even went through some books when I finally found a pattern for a super easy and fast ear warmer! This pattern took me about 45 minutes to complete with the flower included, so I made two! If I had more time I would have lined them with fleece or flannel but they worked really well as they were in the VERY cold Boston wind and snow.


Supplies:
Any WW yarn
Size H 5.0mm hook
Yarn sewing needle
One large button

Abbreviations:
ch - chain
st - stitch
sc - single crochet
hdc - half double crochet
slst - slip stitch

Gauge: 7 hdc  6 rows = approx. 2″ square

Row 1 – ch5, sc in 2nd ch from hook, sc across to end, ch1, turn. (4)
Row 2 – hdc in 1st st, ch2, skip 2 sts, hdc in last st, ch1, turn. (this is your button hole)
Row 3 – 2hdc in 1st st, 2hdc in ch2 sp, 2hdc in last st, ch1, turn. (6)
Row 4 – hdc in each st across, ch1, turn. (6)
Row 5 – 2hdc, hdc in next 4, 2hdc, ch1, turn. (8)
Row 6 – hdc across, ch1, turn. (8)
Row 7 – 2hdc, hdc in next 6, 2hdc, ch1, turn. (10)
Row 8 – hdc across, ch1, turn. (10)
Row 9 – 2hdc, hdc in next 8, 2hdc, ch1, turn. (12)
Row 10 – hdc across, ch1, turn. (12)

*for a wider headband, keep adding stiches at the beginning and end of your odd rows until your happy with the width. Ive made one with 16 stiches across and it was awesome.

Rows 11-50 – REPEAT Row 10. (12)

Row 51 – skip 1st st, hdc in next 9, skip 1 st, hdc in last, ch1, turn. (10)
Row 52 – hdc across, ch1, turn. (10)
Row 53 – skip 1st st, hdc in next 7, skip 1 st, hdc in last, ch1, turn. (8)
Row 54 – hdc across, ch1, turn. (8)
Row 55 – skip 1st st, hdc in next 5, skip 1 st, hdc in last, ch1, turn. (6)
Row 56 – hdc across, ch1, turn. (6)
Row 57 – skip 1st st, hdc in next 3, skip 1 st, hdc in last, ch1, turn. (4)
Row 58 – hdc across, ch1, DO NOT TURN. (4)

Work a sc into the side of the headband all the way around. Try to make sure you are putting one sc in the end of each hdc row. When you hit the corners use 2 sc in sts. Join with a sl st in the 1st sc, tie off and weave in your ends!

Line up your button and sew that on using your yarn needle. Tada!!! Now you can leave the headband as is, or you can add a flower like I did.


There are a ton of different patterns for flowers that you can find, but they are pretty basic if you are not looking for anything fancy.


Simple Flower:

Leave a 6 inch tail or so, this way sewing the flower on will be easy.

Ch 3, work 7 hdc into second ch from hook. Join with first hdc creating a  circle.

5 hdc in 1st st, sc in next st (creates a petal)

repeat until your back at the 1st petal and tie off. Add a button to the center of the flower and sew onto the headband!

Enjoy!!


Wednesday, February 27, 2013

Almost Drapes...

I was in Boston and New York last week with my best friends for a little get away/adventure time and it was so fantastic! Of course I have a ton of pictures but Ill refrain from boring you with those. We basically walked a lot, ate a lot, and did a crap ton or sight seeing. Im still recovering after 3 days back at home from all of the heavy food and nonstop hustle and bustle of the city. Ive been meaning to make some new drapes for the dining room for quite some time but could never get around to it... so I thought to myself what better way to recover than to throw myself into another project?

The dining room drapes came with the house, and it isn't that they are really all that bad, they just aren't right for our décor or color scheme. I have not been able to find something that I really liked so I decided I was going to make my own. I happened to find some super cheap linen drapes for 10 bucks at Big Lots and thought I work....

I had just about finished with the first drape and was genuinely excited about how they were turning out when my Hunny walked in and looked upon them. He stared or a little while and I started to fear that he hated them. CRAP! But instead told me he said how much he liked them...and then asked me if the were the right size.

The...right...size?!?!

@#$%! How could I have overlooked step one of this whole process? The most important one? The drapes are too small and so I have to start over with larger ones. I have a tutorial for them but I want to be able to post the before and after pictures of the final product. Im so pissed at myself.

Anyway, I think I will just sell the first drapes on Etsy and at least now I have the hang of this whole thing. Stay tuned for the ACTUAL drapes...

Friday, February 22, 2013

Hearty Pumpkin Chili

Its funny, I get so sick of summer and being hot... so I wish for winter. Then winter hits and I get so sick of being cold... so I wish for summer. Im just never happy, but at least until I have some delicious, hearty, hot foods while I sit under my blanket with a good movie and my Hunny. This chili is amazing.  The pumpkin gives it a nice creamy texture and it also gives the flavor a lot more depth. You really cant taste the pumpkin itself at all. If you want you can make this meatless and maybe add more beans to it, or play with it as you like. This makes a lot of leftovers too that you can freeze for later. Or this chili is even better the next day!

Ingredients

1 pound ground turkey
1 tbsp. butter
1 small sweet onion
1 green pepper
3 gloves garlic
14.5 oz. can diced tomato (I used fire roasted
14.5 oz. can tomato sauce
14.5 oz. can black beans
1 can pumpkin puree ( not pie filling)
3/4 cup dry lentils
2 cups chicken stock ( about 1 can, you can use vegetable or beef stock as well)
1 tbsp. pumpkin pie spice ( don't worry... )
1 tbsp. chili powder
Dash of cayenne pepper
salt and pepper to taste
14.5 oz. of chickpeas

I didn't really take any pictures of this as I should have, buts its a fairly simple process.


In a stock pot over medium high heat, add the butter and fry the onion, pepper and garlic for a few minutes. Add ground turkey and brown. Then, add all the other ingredients EXCEPT the chickpeas. Cover, reduce the heat and simmer for about 30-40 minutes stirring occasionally. Add the chickpeas and simmer for about 10 minutes more.


 Top with some parmesan cheese or Greek yogurt and serve with some cornbread!


 Give it a try, you will love it! Its very easy to make this a vegan or vegetarian dish. This can feed a whole family for very little money! Enjoy!


Tuesday, February 19, 2013

Mini Strawberry Cream Cheese Hand Pies

Yum Yum Yum!!! I made these for my Hunny (yes, I like to spell it that way!) for valentines day this year and they were so incredibly easy and delicious! They are so versatile too... you can use so many different fillings, the possibilities are endless! I made them into heart shapes so that they were a little more festive. To make them the way that I did all you need is.

Strawberries about 2 cups or so with tops cut off
Sugar
8 oz. Cream Cheese at room temperature.
Frozen Pie Crust or your own favorite pie crust
Powdered Sugar
Cookie Cutter

I put the strawberries in a bowl and sprinkled a little sugar on them and let them sit for a while. Preheat the oven to 350.

Throw the cream cheese and about a quarter cup of sugar into your mixer and mix until smooth and well blended.


I just mashed up the strawberries, youll have to be careful with the juice if you do it this way but I was feeling lazy. You can also chop them up before you add the sugar to them.


Roll out your pie crust and use the cookie  cutters to make an even amount of cutouts. I got about 50 cutouts from my two pie crusts which makes 25 hand pies. This will depend on the size of your cookie cutter.
 

Spoon a little cream cheese into the center of the piecrust cutout, and then some strawberry on top of the cream cheese. Leave some space around the edges of the crust! As you can see from my picture, I wasn't careful with the juices... so don't make my mistake. Use your finger and with either water (or in my case strawberry juice) and dampen the edges of the pie crust. This will make sure that your top crust sticks to your bottom crust.


Place the top crust on the bottom crust and seal around the edges with a fork. Parchment paper is best, but since I didn't have any on hand I just used some greased foil.
 

Stick those babies in the over for about 15-20 minutes, or when the crust is browned. Let them cool completely and if you so desire, sprinkle some powdered sugar on top! So yummy! Enjoy!


Saturday, February 16, 2013

Decoupage Frame

My best friends a I turn 30 this year.. for most of us we feel miserable about it and wouldn't mind freezing time right now. But, there are a few of us crazy girls who have actually looked forward to turning 30 as a new chapter. I happen to be a miserable one, but I wanted to do something special for my girls this year, so I made some decoupage frames that I put some special pictures of us in. Its a little messy and even though you aren't actually working on it for hours, it does take a good day or two to complete. You need:

Flat faced frame of any kind
Scrapbook paper
Glue or Mod Podge
Small wooden figure
Foam Brush
Paint
Scissors
Glue Gun

I didn't have any Mod Podge so I had to make my own. I also didn't have any regular glue (and I call myself a crafter) so I grabbed a glue stick I had, cut off the tip and squeezed the glue into a container.


All you need to do to make your own Decoupage glue is add a little water to your glue. About 4 parts glue to 1 part water. Mix it up and you're ready to go!

Lets do this...

Remove the back and the glass from the frame and place face down on the wrong side of the paper so you can trace around the outside and inside of the frame.


Once you have the shape of your frame traced into your paper, go ahead and cut it out.


Using your foam brush, smear some glue onto the back of your paper and carefully place onto the front of the frame.


Make sure you smooth out any creases or bubbles and that there is no frame showing around the edge of your paper.


If you are happy about your paper placement, apply some glue all over the front of the paper and down the sides of the frame. The paper is going to look wet and ruined but I swear when it dries it will looks fine! I promise!

 
Then we wait for it to dry completely. I took some pictures of my adorable little Lovey love Dog, Archer. He was not impressed with my disturbing his nap....


See, hes quite annoyed... I love him so.

Anyway! You are going to be putting 3 to 4 more coats or glue over the frames, and wait for them to dry each time in-between. This can be a slow process but its worth it. So after you take a few pictures of your beloved animal, we can prepare the wood figures that you will place on your frame. I had birdies on hand so that's what I used. Try to use paint that will complement the paper you used. I painted the birdies grey and will use yellow lettering.


When those dry, use a paint pen or just a small brush and paint (if you have a steady hand) and write whatever you like on your wood figures. I made a "Friends" and a "Best Friends" frame so I went with that
 
 
Remember to keep an eye on your frames and put more glue on them once they've dried again. When they are complete and you have put enough layers of glue on them, attached your wood figures using a glue gun.


I sprayed both my frames with some lacquer as well to make sure they were sealed well. I let that sit for about 24 hours before I put the backs back into the frames and enjoyed my handy work! My girlfriends loved their frames! Enjoy!